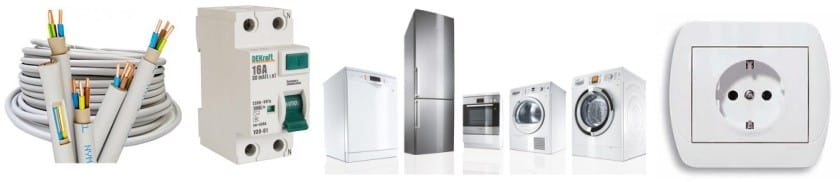
If you believe the statistics, then it is in the kitchen that there is concentrated from 30 to 50% of all the "apartment" appliances, that is, electrical appliances. All of them should be provided with power, but in practice it often happens that the existing power grids do not withstand such a load. It turns out that the wiring in the kitchen should be done by the owner independently - taking into account all individual requirements. You can do some of the work yourself, but only with experience. As for the preparatory processes, including the drafting of electrical wiring, only the owner can do it - in any case, the part where it is necessary to calculate the total power of the equipment. This will determine how many sockets need in the kitchen, as well as understand how to properly position them.
Preparation for work
Wiring in the kitchen requires mandatory drafting. In order for it to be correct, it is imperative to determine which equipment is planned to be placed in this room:
- Electric cooker (hob, oven);
- Fridge;
- Dishwasher;
- Microwave;
- Exhaust hood;
- Electric kettle;
- Toaster, sandwich maker;
- Multicookerconvection oven;
- Food processor, mixer;
- Coffee machine and so on.
The kitchen also often decides to arrange a TV and a washing machine - and for each piece of equipment you need your own outlet.

Tip: you should purchase sockets with a margin and carefully consider the location of the equipment so that you do not get confused in the wires.
But just counting the technique for the design of the wiring will not be enough. Further work is carried out according to this algorithm:
- The type of network coming into the apartment is determined. In the case of single-phase total power will be very limited, in the case of three-phase, the wiring in the kitchen can be created with a noticeable power reserve. As a rule, three-phase wiring in those premises where an electric oven is installed.
- The total power of kitchen appliances is calculated - for each appliance, the nominal power indicated in the data sheet is taken. It should get a value in the range of 8-15 kW (with the simultaneous inclusion of all devices). Of course, in practice, all devices rarely turn on at once, but it will be correct if the wiring is created with a power reserve.
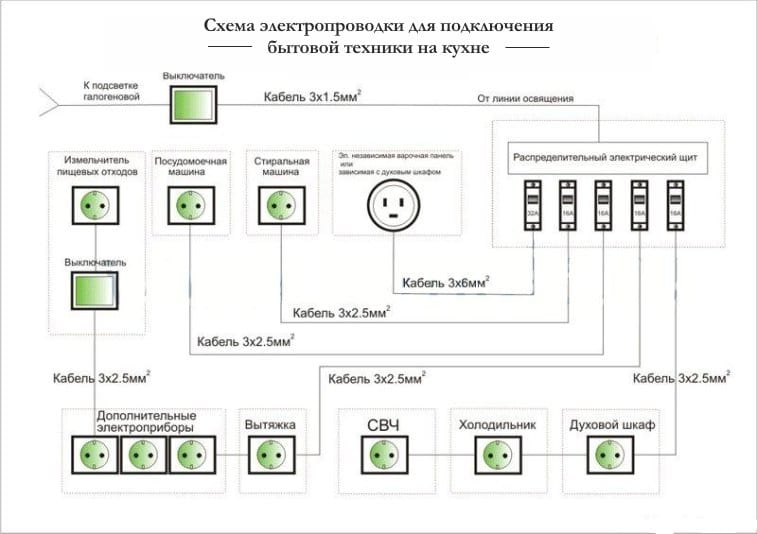
- Select the cable to create the wiring. It is better to use reference data or to entrust the work of a specialist. As for the general recommendations, they are as follows: the higher the total power of the device, the thicker the electrical cable should be. For example, with a total power of 11 kW, a copper wire with a 6-millimeter section is required, and for a power of 15 kW, a cross-section of 10 mm is needed.
There are other recommendations for choosing a cable for electrical wiring in the kitchen:
- VVG-5x6 - five-vein with a cross section of 6 square meters.mm is required for houses with three-phase power supply and connects the lighting panel with the main one;
- VVG-2x6 is necessary to connect the panels in houses with 2-phase power;
- VVG-3x2.5 is used for standard wiring from the panel to the junction boxes, and then to the outlets;
- VVG-3x1.5 is laid from junction boxes to lighting devices;
- VVG-3x4 - for electric stoves.
Installation of electrical panel
Installing the shield with your own hands is as follows:
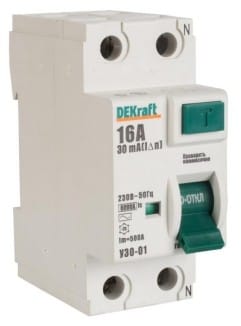
- At the entrance it is necessary to arrange a protective shutdown device (RCD);
- For each RCD, a separate loop of sockets is mounted (no more than 5 parallel connections);
- Separately connected circuit general and local lighting.
Tip: Professionals recommend installing non-standard RCDs in the kitchen, but differential automats with a high degree of protection against excessive moisture.
Basic rules for the selection and location of sockets and switches
The main rules for the placement of sockets and switches when creating electrical wiring with your own hands are as follows:
- The installation of sockets in the kitchen should be done evenly and in such a way that the wiring directly approaches the equipment;
- It is undesirable to leave sagging long wires;
- The location of the sockets is chosen so that they are not located near the sink or stove - this will protect them from deformation due to overheating or high humidity;
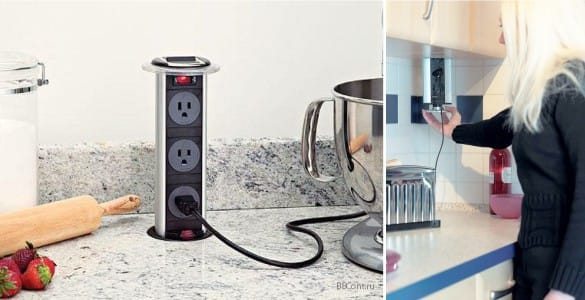
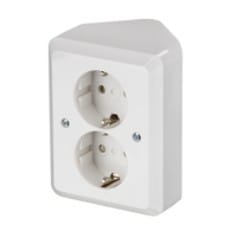
- Recessed (hidden sockets) are perfect for the house where young children live. In addition, such elements will never spoil the design of the room. By the way, often the location of sockets in the tabletop, which is very convenient for connecting desktop equipment;
- The height of the sockets must be strictly observed - low-lying elements are not always safe (especially in homes with small children);
- You cannot connect several powerful devices to the same power point;
- It creates wiring throughout the room - it is not necessary to group sockets in one place, and especially - to bring them together vertically.
How to choose the outlet? And when installing sockets on the tabletop, and when installing them on a wall, preference should be given to products designed for a current of more than 16 amps. The most durable products are equipped with ceramic plates and nickel-plated lamellas. As for the switches, they should be smooth, it will greatly facilitate cleaning.
The location of sockets in the kitchen is carried out at a height of 30-40 cm from the floor, and the switches are installed at a meter height and 15 cm from the door jamb. Sometimes the common kitchen switch is carried out and into the corridor. Separate switches are installed for additional lighting in the work area.
Tip: a special corner socket can be used.
Do-it-yourself wiring - basic installation steps
The layout is done only according to the project created in advance and after all the necessary materials are acquired.
The posting is created in the following sequence:
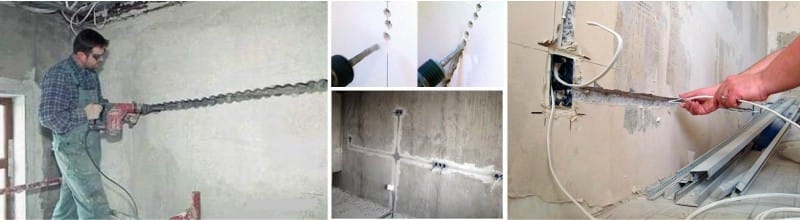
- Strobroblyruyut walls - in order to hide the wires inside the walls and camouflaged finishing finish. This will require a drill, a special wall chaser or a chisel. Before creating the strobe, markup is performed, marking on the walls the places where the wiring will take place. The length of the strobe should be minimal. If there is a need to make a turn, then it is performed at 90 °;
Important! When stroking, be sure to use goggles and a respirator for protection.
- The necessary strokes are made on the markup, and then nests are laid for floor plugs or recessed sockets. If it is planned to install the sockets on the tabletop, the sockets are not executed;
- Laying wires in the grooves is carried out using corrugated pipe. To do this, every 30 cm drill holes in the strobe - with their help, the corrugation will be fastened to the dowel-bracket. After the wiring is completed and all the wires are laid, the grooves are covered with a solution;
- Wiring involves the installation of sockets and switches - this is the final stage of work. Plastic podrozetniki are installed in the pre-prepared recesses. They lead wires, where then switches and sockets will be connected. The bottom plate is leveled and securely fixed in the wall with screws and mortar. Important! Installation of sockets is carried out only upon completion of the finishing work (even if the sockets are recessed): the wires coming out of the walls are connected to the terminals, then the mechanism is fixed in the bottom, and then the plastic covers are put on;
- At the last stage, the wiring is connected to the network. Wires from sockets, lighting points and switches in the junction box are connected to the main wire. All connections must be insulated - for this purpose, use PPE or electrical tape.
Creating a wiring in the kitchen with your hands requires special knowledge and skills, since working with electrical connections are considered dangerous. By the way, the creation of open, that is, outdoor wiring is permissible in the kitchen. This method involves the use of protective boxes, which will be laid wires. The use of boxes is advisable in the event that it became necessary to replace the wiring in an already repaired room.
 (Rate the material! Already voted:13 average rating: 5,00 from 5)